 Aim and Zoom 1.1 Help Accueil
When cropping a photo, especially if it was taken using a wide-angle lens, as soon as you move away from the center, the perspectives appear distorted.
This application automatically fixes this problem.
For this, Aim and Zoom does not propose to arbitrarily manipulate the image or to create impossible perspectives.
It simply restores the image that would have been obtained, for example using a telephoto lens, from the same location, but aiming at a point other than the center of the original photo.
Limitations:
Open a photo in Aim and Zoom
A lot of methods:
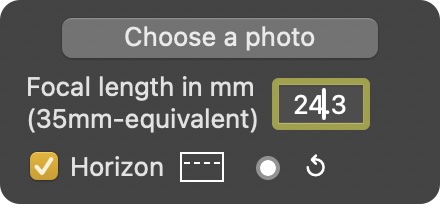
Enter the focal length
When opening a photo, depending on the informations contained in the metadata, there are three possibilities.
Place the horizon line
If the horizon line is visible in the photo, check Horizon.
A dotted line appears, which you can drag parallel to itself and rotate using the end disks.
Place this dotted line on this horizon line and any cropping will automatically be correctly angled.
Aim
In the right photo, drag the green cross to the point chosen to be the center of the output image.
Zoom
Click on the ZOOM green circle on the right of the photo and drag up or down.
Under the photo, the size (in pixels) of the output image and its theoretical 35mm-equivalent focal length are shown in green.

Choose the frame ratio
By default, the frame ratio is that of the original photo, but you can choose another one from the pop-up menu.
If you select Free (first line of the pop-up menu), small green disks on the sides of the frame allow you to independently modify its height and width.
Angle the frame
The frame should be angled so that the central vertical line of the output image is actually vertical.
This adjustment cannot be done automatically because it depends on the location of the horizon line in the original photo, a location that cannot be deduced from the metadata.

Add guide lines
Check Guides.
A horizontal white line and a vertical one appear.
These lines can be dragged (separately) via the small image on the left.
Green frame/Red frame
If the green frame extends beyond the photo, it turns red.
The output image will then have a black part (visible in the small image on the left).
With short focal lengths, the green frame may be stopped by a Geometrical limit.
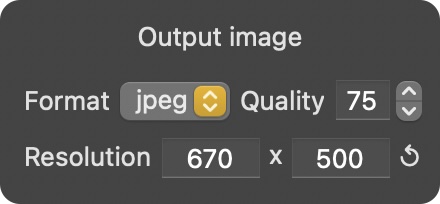
Choose the output image format
The output image can be in PNG or JPEG format.
If the selected format is JPEG, quality can be set between 0 and 100.
Change the output image resolution
Enter the desired number of pixels for width (first field) or for height (second field).
The other field is automatically adjusted.
Spontaneous display
When opening a photo, the Added Devices window appears spontaneously if the metadata provides the Make and Model of the device as well as the actual focal length, but does not provide the 35mm-equivalent focal length.
Then, the only action allowed is to select the sensor format.
When Save is clicked, the window goes into edition mode.
Edition
The Added Devices window in edition mode can be accessed at any time by selecting Added Devices/Edit the list from the application menu bar.
In this mode it is possible to